Everyone who hears these words of Mine and puts them into practice is like a wise man who built his house on the rock. The rain came down, the streams rose, and the winds blew and beat against that house; yet it did not fall, because it had its foundation on the rock. Matthew 7:24-25

Friday, April 30, 2010

Sewing Experiment

I found a tutorial for the cutest and simplest smocked baby romper online the other day and just had to try it out.  You can visit Samster Mommy to see it for yourself.  The instructions are for a romper, but I finished this project as a dresss.  I plan on trying to make a romper next.

The project starts with, get this, an adult t-shirt, and it also calls for elastic thread.  I've never used elastic thread, and I was eager to see how it worked.

I recruited a monkey to help me with the before photo.  Here's what I started with.


The elastic thread....pretty cool, huh?


Ta Da!  Isn't it cute?  And so is the dress.


And the back.......


Work it, girl!  The flower is one that I had saved from one of my old shirts.  A perfect match.  Score one for the frugal mom!


Look out, Lu Lu!  Here comes Buddy.


I know I should have dropped the camera to rescue my baby from all that Buddy-love, but don't worry.  No animals (or babies) were hurt in the making of this blog.

Wednesday, April 28, 2010

Update on My "Pet Rock"

Had an appointment today with my doctor to see what is to be done about my "pet rock." (Sorry about the lame jokes, but I 'm just trying to turn a negative into a positive here, people.)

Anyway, looks like I'm going to have surgery again next week to have the stone and the stent removed.  The good news is I'll be asleep.  The bad news is I'll be asleep.  I just don't like being put to sleep.  And to make it worse, the Tool Man refers to it as being "put down."  Sounds like something you would do to an old dog or something.  Ugghhh...let's not thing about that, anymore.

Let's think happy thoughts.  Like my little chicks, which will be hatching in 5 days!  I suppose they look something like this now.


Aren't they adorable?!

Tuesday, April 27, 2010

Royal Door Hanger

I've been thinking about some projects I've done that I could share with ya'll. So I decided to show you what I made to hang on my hospital room door when Lucy was born. I suppose you could argue I'm a little behind in posting this, say, nine months. But give me a break, I wasn't blogging then.


You could customize this project for any occassion, or you could make one "just because" to hang on your front door.  I'm thinking of hanging this one in front of the window in Lucy's new room.         

I started this project with a metal crown I found in Hobby Lobby.  This was last summer, so I don't know if you would still be able to find the same crown or not.  I also picked up a spray of flowers, coordinating  ribbon, 1 yard each of pink organza and pearl tulle, and a 1-2 inch thick piece of florist foam.  I went for a pink scheme because I was expecting a girl, but you could go blue for boy or whatever color scheme you like.

You'll also need a pair of wire cutters, hot glue gun, scissors, needle and thread, and utility knife.

Let's get started...

1.  Trace the bottom of your crown on the foam.  Then, using the utility knife, cut out the circle slightly smaller than the line you traced.  Your foam circle should easily slip in and out of the base of the crown, because you will be adding bulk with the organza and the ribbon.  Don't make it too small though.  You basically want it to be so snug that, in the end, it will hold itself into place once the organza and ribbon are added to it.

2.  Gather one end of the organza and tulle.  You can do both at the same time.  Just line up the edges of both pieces of fabric and using your needle and thread, sew a long running stitch across the top edge.   Leave long tails on each end of the thread.  When you've sewn all the way across, hold the end of the thread and push the fabric in to make gathers.  Keep working with the fabric until it's just wide enough to go around your foam circle.  Make sure your gathers are evenly distributed.  Then hot glue the fabric, tulle side out, around the outside of your foam circle. (Note:  You could hem the bottom edges of the tulle and organza if you'd like, but I was really pregnant and really tired, and quite frankly, just didn't want to.)

3.  Cut a piece of ribbon long enough to go around the foam circle and glue into place over the tulle.

4.  Now push the foam circle up into the bottom of the crown so the fabric hangs down nicely.  You may need to add hot glue to secure the foam into the crown, but mine was such a snug fit that stayed by itself.

5.  Using the wire cutters, snip individual stems from the floral spray.  Then push the stems into place through the top of the crown into the foam.


6.  Cut a piece of ribbon for the hanger.  Tie each end onto opposite sides of the crown making sure the crown will hang level.

Ta Da!!!  Wasn't that easy?  I can't tell you how many compliments I got on this hanger while I was in the hospital.  I think it is so unique.  Much better than a sad little wreath, don't you think?

Sorry I don't have more pictures to share.  If my instructions aren't clear, or if you have any questions I'll be happy to answer them.


Now go out and make one for yourself, your friend, your sister, etc. etc. etc.

Burlap Picture Frame

I've been itching to do something crafty, so during naptime yesterday I snagged the opportunity to get my creative juices flowing.  Since the upstairs bedrooms are nearing completion, I decided to make something to go in Lucy's new room.  She's getting an all white, shabby chic room, so I thought a scrappy, burlap frame would be nice...nice and easy and inexpensive.

My supplies:
hot glue gun
scissors
burlap
frame
ribbons, buttons, baubles, etc.


Remove backing and glass from frame.
Cut burlap into 1"-2" strips.


Wrap burlap strips around from of frame and secure with glue.  Be sure not to cover the part where the glass and backing go, or you won't be able to get them back in.


Got it covered!  I want the frame to look a little worn, but it needs a bit of a trim.


Now, that's much better!


Time to beautify.  Ladies, grab your glue guns!


I made these fabric roses a couple of weeks ago.  You can learn more about them here.  They just needed a few little embellishments, and voila!


All done!  What do you think?  Can't wait to see it in Lucy's new room.

Monday, April 26, 2010

Big Creek Farms

Are you sitting down?  I've got some exciting news!

We're expecting!   CHICKS!!!  Wahoo!!!  A dozen of them.

They're hatching Monday and will be here on Wednesday.  I've been bugging (and begging) the Tool Man about getting some chickens for several months.  Finally, after I showed him this coop he gave in.  Thanks, Heather.

Well, my coop doesn't exactly look like the French chateau that Heather built, but it fits in nicely here at Big Creek Farms.  (Has a nice ring to it, doesn't it?)  And most importantly, it fits into our budget...that is it cost us next to nothing.  It is teeny tiny, 4 ft. by 4 ft., and it is built mostly with scrap lumber leftover from various projects.

Three cheers for the Tool Man!
Hip Hip Hooray!
Hip Hip Hooray!
Hip Hip Hooray!

I don't call him the Tool Man for nothin'.  Watch your fingers!


Notice the box of Scooby Snacks in the coop.  I guess every tool man needs his nourishment.


Don't forget the hardware cloth!  I don't want any chicken snakes stealing my eggs.


A hinged lid for gathering the eggs.  Good, Tool Man.  Very good!

We're not quite finished with the coop yet. I'll show you more when we're done and we move it out into the yard.  No, I'm not keeping this lovely under my carport.

As for the chickens, we're getting Easter Eggers.  They are supposedly friendly and docile - the kind of chickens that will follow you around in the yard and eat treats out of your hands. 


EE's lay colored eggs - blue, green, brown...I'm looking forward to that.  My chicken-farming friend, Allison, says fresh eggs are the best for baking.  Can't wait to try that out.  If you want to know more about chickens, I've found BackyardChickens.com to be very helpful.  It's also the place where I snatched these pictures.  I'll post my own pictures as soon as the babies arrive!


Friday, April 23, 2010

The Cruise That Wasn't

I'm in mourning.

I'm supposed to be boarding a cruise ship tomorrow for 7 fun-filled days in the Caribbean.

But I decided that kidney stones would be more fun.....................
So, I won't be cruising anytime soon.  (I'm making boo hooing noises now.)

If you've ever heard that kidney stones are painful...they are.
If you've heard that it's worse than childbirth...it is!

And we aren't talking about, "Hey, that kind of hurt" painful.  We're talking "Jesus, help me!  I need morphine NOW!" painful.

Four days in the hospital, dozens of painkillers, 8 X-rays, 1 surgery, thousands of dollars, and misery out the wahzoo.  Yeah, that's definitely more exciting than some old cruise, right?

The absolute worst thing about this whole experience though...


4 days and nights away from my 2 precious monkeys.  There's no cure for that pain.

Thanks for being patient while I wallow in self-pity.

Still waiting on that stone if you know what I mean ;)

Wednesday, April 21, 2010

Biedenharn Portraits 2010

My mom and I took the monkeys to Biedenharn Gardens last week for a photo shoot.  I love to go over there this time of year - the azaleas are in full bloom now.


It is such a beautiful southern shade garden.  I'm having visions of Scarlett at Tara right now...aaaahhhh.

Here I'll help you visualize.


Only Scarlett wasn't chasing after two wild monkeys.  Just men.  Anyway, back to the 21st century.


Does anyone know how to get a kid to smile?  I mean a REAL smile.


Or just look natural maybe.  Not like some freaky little manequin.


MUCH better. 


Oh, man!  That's one good looking boy, and I double dare triple-DOG dare anyone to say any different.  I'm gonna be beating off the girls left and right.  And I mean it, girls.  I will beat you off.

One girl I won't be beating...


Ooo-Weee!  Ain't she pretty?  And cute and sweet and precious...you get the picture.  I'm in love with this girl.


These pictures crack me up.  He had to go.  You know, GO.  Pretty bad I guess, because he resorted to the potty dance.  Oh, Lord, have mercy!  What would I do without these kids?


Thanks, Mom! 


Can you keep a secret?  I didn't find out 'til a little later, but Ty was picking these flowers off of a camelia bush.  Eek!  Sorry, Mrs. Biedenharn.  I thought he was just gathering blooms that had already fallen to the ground.  Honest, I did.

Oh, well.  I can't think about that today.  I'll just think about that tomorrow.

Sunday, April 11, 2010

The Bees Knees

WARNING!  If you have a fear of flying insects, then you might want to look away right about now.

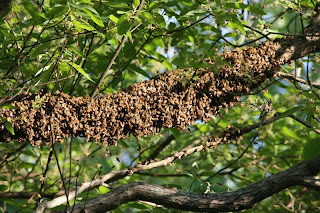
The Tool Man came running into the house yesterday afternoon wanting me to look out into our backyard.  When he opened our back door I could hear insects swarming.

It was bees.  Thousands of them!

I'm not exaggerrating.

Thousands.

Swarming around a tree in our backyard.  Take a look for yourself.


After a few minutes they congregated on a limb in the tree.


This picture gives me the heebee geebees.  Ew, yuck, and gross!  But still kind of cool and interesting.

Thankfully they were gone this morning.  Whew!

Wednesday, April 7, 2010

Sour Cream Cake

I made this cake for my family get-together on Easter Sunday, and boy howdy, did they like it!  Thanks Kaye C. for sharing the recipe with me.  Wish I would have thought to take a picture of the cake for ya'll before it got devoured.  Hope you enjoy!

Sour Cream Cake

For Cake:
  • 1 box yellow cake mix
  • 1 stick BUTTER, divided, melted
  • 1-8 oz. carton sour cream
  • 3/4 cup veg. oil
  • 1/2 cup sugar
  • 4 eggs
For Glaze:
  • 1 cup powdered sugar
  • 3 Tbsp milk
  • 1 tsp vanilla extract

Preheat oven to 350.  In a bowl, mix together 1/2 stick melted butter and sugar.  Add cake mix, sour cream, oil, and eggs - one at a time - mixing thoroughly.  Pour batter into a greased 13 X 9 pan.  Melt remaining 1/2 stick of butter and pour over top of batter.  (Everything is better with butter!)  Bake 35-40 minutes or until cake begins to pull away from sides of pan.

Meanwhile combine all ingredients for glaze and mix well.  Drizzle over hot cake.

This cake is SOOOOO good served warm with coffee.  It'll make your tongue want to slap your eyeballs out! Ha.

Tuesday, April 6, 2010

When Mom's Away...

I leave the Tool Man alone with the monkeys for one hour and this is what happens!

A peaceful evening by the creek, right?  Wrong!!!

Let's take a closer look, shall we.

Gasp!  Up to his liver in mud!

"Hey ya'll! Care to join me?"

Geronimo!

I believe this is what's known as "wallering."  He's not in the water here.  He's waist deep in stinky mud.

Thankfully, after a quick hosing down, he was clean before I made it back home.